 Hiked Thursday, March 3. I suspect it's actually less than three horizontal miles, round-trip but the level of difficulty means you exert a whole lot more energy than you would for a normal three mile hike, so I'm counting it! :D
I hiked the lower section of this trail earlier this year, and a few times last year. Trip reports are here and here. Usually, I just go to the Thalehaha Overlook. However, having gotten a view of Leontine Falls from near Echo Mountain on Tuesday (and failed at my effort to get to a different waterfall then, as well), I decided it was time to venture further up Rubio Canyon. I'd only done this once before, and, that time, I failed to make it to any really impressive water features beyond Thalehaha.
 The first 1/2 mile of this trail is well-defined, even though the trail head is almost hidden. It gets more difficult only after you've reached the remains of the foundation for the pavilion that they used to use to load trains heading up to Echo Mountain.
After you navigate your way through the foundation footings (possibly using a rope that has been tied there, though it's not necessary), you'll see a large (about eight-inch in diameter) metal water pipe. If you were to turn up the hill here, you'd be on your way to climbing out of Rubio Canyon, to Echo Mountain. (My description of doing that hike in reverse is here). Instead, you should make your way either over or under the metal pipe, then head down to the creek.
The next 1/4 mile involves repeated stream crossings and boulder hopping. It's not too hard when you're fresh, but the return trip can be tricky, at least if you've got "noodle legs" from all the climbing required on the later parts of this trip.
 Because of recent pruning done by unofficial trail keepers, the path is easier now that it was a year or so ago. The view of Moss Grotto Falls is also clearer.
Ribbon Rock and Moss Grotto falls are pretty small, probably 8 feet and 15 feet high, respectively. Even now, the water flow is modest, so the sound you hear is more of a meow than a roar.
 If you continue past these falls, the going gets a LOT tougher. In many areas, there are extended stretches of steepness, and several spots where you could cause yourself serious injury if you're careless (or even if you're careful), so don't go further unless you're prepared for the risk. Also, be prepared for ticks. For the second time in as many trips in this area, I picked up ticks--one bit my arm, one was walking on the outside of my pants when I got back to my car, and two I discovered on my under-garments after I took them off to take a shower at home. So, bottom line for me--I'm not hiking here again for a while, and if I do come back, I'm using insect repellent, and I'm applying it both on my underwear and skin and over my clothes!
 If you do continue past the first two falls, you cross the stream and head to the east. The trail is less traveled but still obvious. After about 80 yards, you come across a tree in the middle of the trail. Here, a trail heads off to the left. That one takes you (after some steepness and lots of shrubbery) to the top of Moss Grotto Falls. About 30 yards upstream from Moss Grotto is Grand Chasm Falls. Proceeding further up this waterway would seem to be pretty near impossible without technical assistance.
 Getting back to the main trail, another 100 yards or so after the first tree, there's a second, larger tree in the middle of the trail. An eroded gully seems to guide you to the left of this tree. But if you push under the leaning greenery, on the right, you can walk around the tree, then loop back and have an easier approach to the trail that continues to the Thalehaha Overlook.
As I noted, that's usually where I head to, without the detour to Grand Chasm. Because after Thalehaha, the going gets REALLY steep.
From the overlook, you can see both Thalehaha and another, smaller waterfall (Roaring Rift) just below it.
 Because of the distance involved and the lack of anything to put the falls to scale, it's hard to judge their height. My suspicion is that Thalehaha is easily 80 feet tall, and the lower, apparently-unnamed falls is 25 feet or so tall.
From the overlook, you may see a faint trail that continues to the east, up along the ridge you're standing on. This route is, again, steep and shrubbery-covered, another place to get tired and pick up ticks. It's also less than obvious in places. I just kept in mind that the goal was to go upstream and not up to the next ridgeline.
 After what was probably only 1/8th of a mile (but felt much longer), I came across an overlook where I could see part of Leontine Falls. It presented a very similar appearance to what I saw from east of Echo Mountain, although I was, of course, now much closer and lower.
 I also passed an anchor for ropes that one would use to get down to the base of Thalehaha Falls.
After more twisting, steepness, and shrubbery (I have Monty Python and the Holy Grail on my mind!), the trail finally reaches the lip of a large gully. Now the steepness becomes downhill rather than up hill.
 After descending perhaps 100 feet, you start running across numerous ropes tied to trees. You will probably need to use them, if only for reassurance, as you lower yourself down to the bottom of the ravine. Because it's north-facing, the dirt here stays muddy here pretty long. It's also rocky, so you should make an attempt to ascertain if anyone is down below before you start the rope section of the descent. Similarly, if you're traveling with other people, I would suggest waiting until the first one down is across the river before having the second start their way down. Actually, I don't really even suggest ANYONE proceed all the way down there, but if you're going to go down there. . . .
 When you reach the bottom of the first descent, you've got a small stream running right near by. If no one's around, you might even find yourself enjoying the solitude. There are plenty of ferns and moss growing all around, and it feels sort of northwestern.
 On the other side of the creek, you'll find another rope. I climbed right up this next ridge. I did not even notice at the time that there was a faint trail that I could catch from about 2/3 of the way up this ridge to my right, towards Leontine Falls. I guess I thought continuing over the ridge was the way there (it isn't).
Once over the ridge, I noticed a faint trail on opposite wall, but I'm not sure where that one goes. I could not easily make my way up that other side. In other words, I'm pretty sure I *could* have made it up there, but on the 1/2 of 1% chance that I failed, the fall would have been very bad for me. So I took a few shots of the cascades on this side, then made my way back over the ridge.
 When I came back over top, I finally noticed the trail towards Leontine. I worked the rope around so it give me some support as I side-stepped my way to the right (right, when facing the hill I was descending). From there, several cascades splashed towards me, with Leontine visible beyond.
With the wet rocks, I picked my way very carefully along these waters. Fortunately for me, the water was shallow enough and the potential falls small enough that I knew if I slipped here, the most likely bad outcome would be wet feet and maybe a wet butt, but no massive head or spinal injuries. :D
I successfully made my way past the barriers to the broad area below Leontine Falls, where I shot lots of photos and a short video.
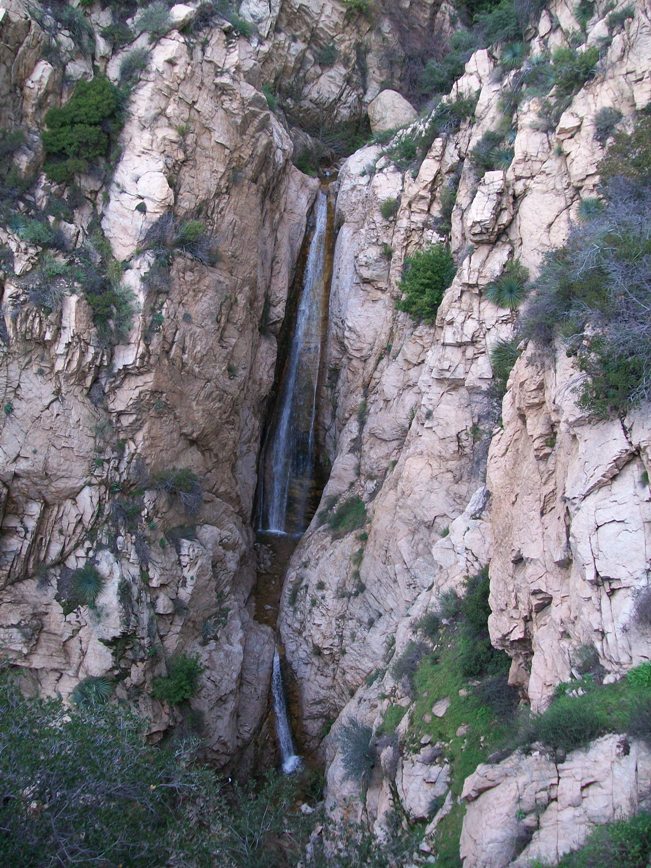
 The waterflow from Leontine is even less than that of Moss Grotto and Ribbon Rock, because Leontine is above a tributary that contributes to the latter two falls' volume. Nonetheless, the water almost seems shot out of a pipe as it comes over the lip of the falls. The thin ribbon of water spreads along several tiers on the way down. Also, the waterfall is so tall that it can't all be fit in one shot. I figure the lower section is about fifteen feet tall, while the upper section is 45 feet or so. Just an estimate.
The picture immediately above is of the top portion of Leotine, while the picture below is of the lower portion. And, of course, the video pans from top to bottom, so you can see how the two pictures would stitch together.
 By the way, I took my Kodak camera today rather than the Nikon. Because of the degree of difficulty, I didn't want to risk destroying my new camera with an untimely fall!
After Leontine, I slowly made my way back the car. I got back there about 6pm, about 3 1/2 hours after I started. And I definitely had noodle legs by the time I was done.
A more detailed description of this area, and some historical context, can be found on Dan Simpson's Hiking Page.


Sounds like quite an adventure. I'm eager to return to Rubio to explore more. Thanks for your posting!
ReplyDelete